Connecting target board
Connecting target board 타겟 보드 연결하기
The following is a description of the case of using the target board "nRF52840 DK".
다음은 타겟 보드 "nRF52840 DK"를 사용하는 경우에 대한 설명이다.
If you run an application using the virtual machine provided by QEMU, skip this step.
큐이엠유가 제공하는 가상머신을 사용해 응용을 실행시킬 경우 이 과정은 생략한다.
1. Connect the host computer and the target board with a USB cable as shown in the following figure.
다음 그림과 같이 호스트 컴퓨터와 타겟 보드를 USB 케이블로 연결한다.
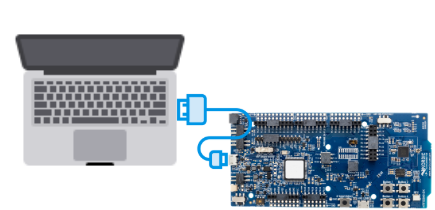
Since the target board "nRF52840 DK" has a built-in JTAG debugger "J-Link OB" and a USB CDC UART Port device, the JTAG debugger and UART communication functions can be used only with this connection.
타겟 보드 "nRF52840 DK"는 JTAG 디버거 "J-Link OB"와 USB CDC Virtual UART Port 장치를 내장하고 있기 때문에, 이 연결만으로 JTAG 디버거와 UART 통신 기능을 사용할 수 있다.
2. Run a UART communication program on the host computer, set as follows, and open UART port.
호스트 컴퓨터에서 UART 통신 프로그램을 실행한 다음, 다음과 같이 설정하고 UART 포트를 연다.
- UART port:
- <JLink CDC UART Port Name>
- Baud rate:
- 115200
- Data size:
- 8
- Parity:
- None
- Stop bits:
- 1
- Flow control:
- None
On Windows, "JLink CDC UART Port Name" can be found in "Device Manager" > "Ports (COM & LPT).
On Linux, it is "/dev/ttyACM...", and On macOS it is "/dev/tty.usbmodem..." or "/dev/cu.usbmodem..."
윈도우에서 "JLink CDC UART Port Name"은 "장치 관리자" > "포트 (COM & LPT)"에서 확인할 수 있다.
리눅스에서는 "/dev/ttyACM...", 맥오에스에서는 "/dev/tty.usbmodem..." 또는 "/dev/cu.usbmodem..." 이다.