Setting Up the Development Environment on Windows
- Sungho Park
Setting Up the Development Environment on Windows 윈도우에 개발 환경 설정하기
The following describes the process of setting up the Ubinos development environment on the Windows 10 64-bit version. The installation packages used are the latest stable version on February 28, 2024. Use default values for installation options not mentioned.
다음은 윈도우 10 64비트 버전에 유비노스 개발 환경을 설정하는 과정을 설명한다. 사용된 설치 패키지는 2024년 2월 28일의 최신 안정 버전이다. 언급하지 않은 설치 선택 사항은 기본 값을 사용한다.
We recommend using a Windows account that consists of only English letters and numbers. Otherwise, some development tools may malfunction. (Of course, in most cases, the problem can be solved through additional settings for each tool.)
영문자와 숫자만으로 구성된 윈도우 계정을 사용해 작업할 것을 추천한다. 그렇지 않을 경우 일부 개발 도구들이 오동작 할 수 있다. (물론 대부분의 경우 각 도구 별 추가 설정 작업을 통해 문제를 해결 할 수 있다.)
Installing CMake 씨메이크 설치하기
1. Download and install the installation package from the following website.
다음 웹사이트에서 설치 패키지를 받아서 설치한다.
- https://cmake.org
- Download
- cmake-3.29.0-rc2-windows-x86_64.msi
- Download
- Installation options 설치 선택 사항
- Add CMake to the system PATH for all users: Select
Installing Git 깃 설치하기
1. Download and install the installation package from the following website.
다음 웹사이트에서 설치 패키지를 받아서 설치한다.
- https://git-scm.com
- Download for Windows → Click here to download the latest 64-bit version
- Git-2.44.0-64-bit.exe
- Download for Windows → Click here to download the latest 64-bit version
2. Open the command prompt "cmd" and add my name and e-mail into git config by typing the following command.
명령어 프롬프트 "cmd"를 연 후, 다음 명령을 입력해 깃 설정에 자신의 이름과 이메일을 추가한다.
git config --global user.name <name>
git config --global user.email <email>
Example:
git config --global user.name "Gildong Hong"
git config --global user.email gdh@unknown.com
Installing Python 파이썬 설치하기
1. Download and install the installation package from the following website.
다음 웹사이트에서 설치 패키지를 받아서 설치한다.
- https://python.org
- Downloads
- Download Python 3.10.11
- python-3.10.11-amd64.exe
- Download Python 3.10.11
- Downloads
- Installation options 설치 선택 사항
- Add Python 3.10 to PATH: Check
2. Open the command prompt "cmd" and install ttkwidgets by typing the following command.
명령어 프롬프트 "cmd"를 연 후, 다음 명령을 입력해 ttkwidgets를 설치한다.
pip install ttkwidgets virtualenv
Installing GNU ARM Embedded Toolchain 그누 암 임베디드 툴체인 설치하기
1. Download and install the installation package(gcc-arm-none-eabi-10.3-2021.10) from the following website.
다음 웹사이트에서 설치 패키지(gcc-arm-none-eabi-10.3-2021.10)를 받아서 설치한다.
- https://developer.arm.com
- Downloads →
- Tools and Software → Open Source → Developer Tools → GNU Toolchain → Downloads
- GNU toolchain releases for Embedded processors (discontinued) (https://developer.arm.com/downloads/-/gnu-rm)
- gcc-arm-none-eabi-10.3-2021.10-win32.exe
- GNU toolchain releases for Embedded processors (discontinued) (https://developer.arm.com/downloads/-/gnu-rm)
- Installation options 설치 선택 사항
- Add path to environment variable: Check
Installing MSYS2 엠시스2 설치하기
1. Download and install the installation package from the following website.
다음 웹사이트에서 설치 패키지를 받아서 설치한다.
- http://www.msys2.org
- msys2-x86_64-20240113.exe
2. After clicking the Start button, type "sysdm.cpl" and press enter to open the system properties. And add the path of the executable file installed at the end of the user environment variable "PATH". (Path changes are reflected from the cmd opened after the change.)
시작 버튼을 누른 후 "sysdm.cpl"를 입력하고 엔터키를 눌러 시스템 속성을 연다. 그리고 사용자 환경 변수 "PATH"의 마지막 부분에 설치된 실행 파일 경로를 추가한다. (Path 변경 사항은, 변경 후 연 cmd 부터 반영된다.)
- Advanced 고급 → Environment Variables 환경 변수 → User variables 사용자 변수 → Path
- C:\msys64\usr\bin
- C:\msys64\ucrt64\bin
3. Open the command prompt "cmd" and install basic development environment packages by typing the following command. (If the screen is not updated for a long time during installation, press the Enter key.)
명령어 프롬프트 "cmd"를 연 후, 다음 명령을 입력해 기본 개발 환경 패키지들을 설치한다. (설치 중 화면이 장기간 갱신되지 않는 경우 엔터키를 눌러준다.)
pacman -S --needed base-devel git openssh mingw-w64-ucrt-x86_64-toolchain mingw-w64-ucrt-x86_64-ccache
Installing VSCode 브이에스코드 설치하기
1. Download and install the installation package from the following website.
다음 웹사이트에서 설치 패키지를 받아서 설치한다.
- https://code.visualstudio.com
- Download
- ...
- Download
2. Install the following extensions.
다음 Extension들을 설치한다.
- C/C++ (by Microsoft)
- C/C++ Themes (by Microsoft)
- C/C++ Extension Pack (by Microsoft)
- Python (by Microsoft)
- CodeLLDB (by Vadim Chugunov)
- CMake (by twxs)
- MemoryView (by mcu-debug)
- ARM Assembly (by dan-c-underwood)
- Open (by sandcastle)
3. If CMake Tools (by Microsoft) is Installed, disable it.
CMake Tools (by Microsoft) 가 설치되어 있으면, disable 시킨다.
Installing QEMU 큐이엠유 설치하기
1. Open the command prompt "cmd" and install qemu packages by typing the following command.
명령어 프롬프트 "cmd"를 연 후, 다음 명령을 입력해 QEMU 패키지를 설치한다.
pacman -S --needed mingw-w64-ucrt-x86_64-qemu
Check installation and environment settings 설치 및 환경 설정 확인하기
1. After clicking the Start button, type "sysdm.cpl" and press enter to open the system properties. Check whether the user environment variable “PATH” and the system environment variable “PATH” are set properly.
시작 버튼을 누른 후 "sysdm.cpl"를 입력하고 엔터키를 눌러 시스템 속성을 연다. 그리고 사용자 환경 변수 "PATH"와 시스템 환경 변수 "PATH"가 정상적으로 설정되어 있는지 확인한다.
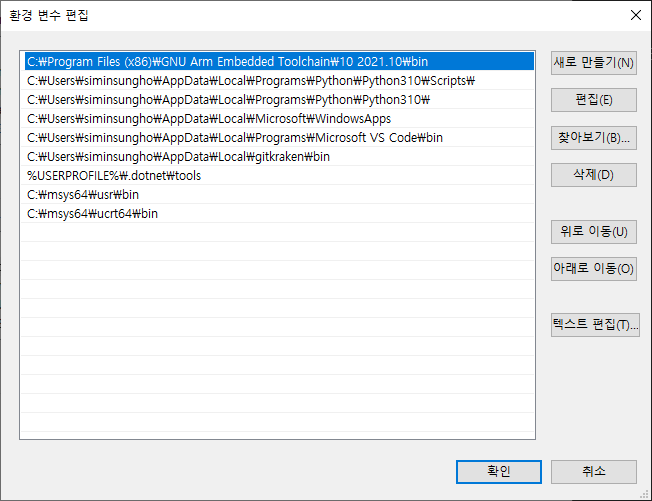
- Example of setting user environment variable "PATH" (The path to MSYS2 must be located last.)
사용자 환경 변수 "PATH" 설정 예 (MSYS2의 경로는 가장 마지막에 위치해야 한다.)
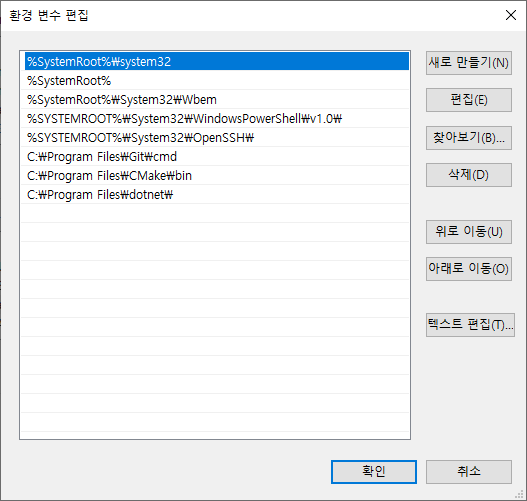
- Example of setting system environment variable "PATH"
시스템 환경 변수 "PATH 설정 예
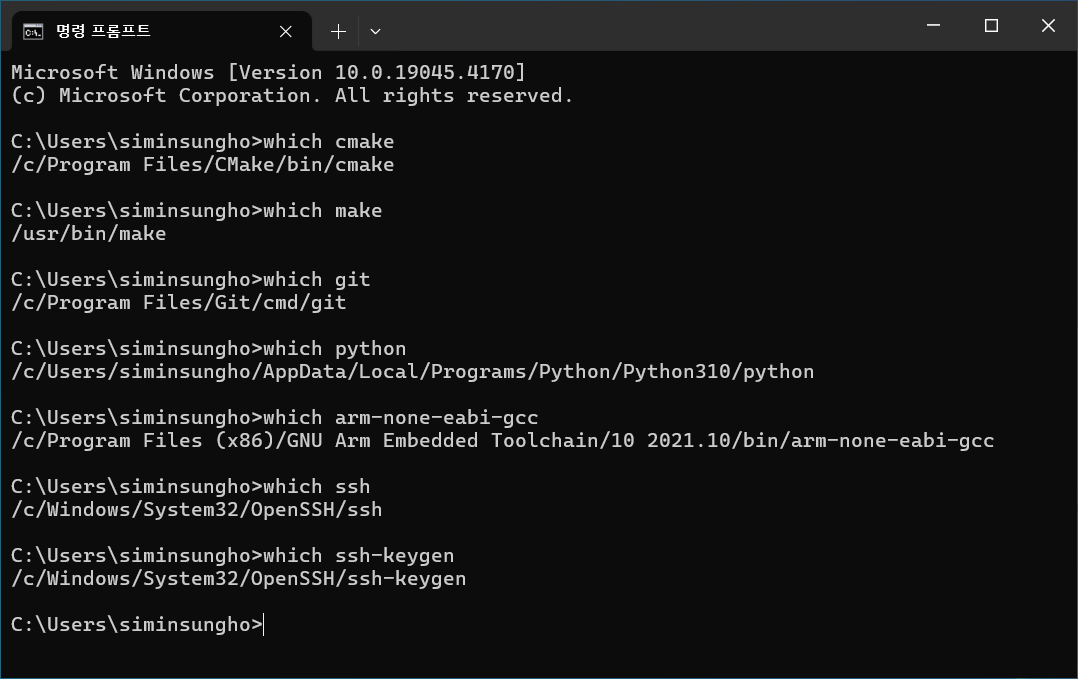
2. Open the command prompt "cmd" and enter the following command to check whether the development tools have been installed properly.
명령어 프롬프트 "cmd"를 연 후, 다음 명령을 입력해 개발 도구들이 정상적으로 설치되었는지 확인한다.
which cmake
which make
which git
which python
which arm-none-eabi-gcc
which ssh
which ssh-keygen
- Example of normal installation
정상적으로 설치되었을 경우의 예
Generate SSH key and register it on GitHub 에스에스에이치 키를 생성하고 깃허브에 등록하기
1. Open the command prompt "cmd" and enter the following command to generate ssh key. (For the information requested during the creation process, use the default values by pressing the Enter key.)
명령어 프롬프트 "cmd"를 연 후, 다음 명령을 입력해 에스에스에이치 키를 생성한다. (생성 과정에서 요청받는 정보는 엔터 키를 눌러 기본값을 사용한다.)
ssh-keygen -t rsa
2 Enter the following command to add github.com into known_hosts.
다음 명령을 입력해 github.com을 known_hosts에 추가한다.
ssh-keyscan -t rsa github.com >> "%USERPROFILE%\.ssh\known_hosts"
3. After clicking the Start button, type "MSYS2 UCRT64" and enter to open MSYS2. And enter the following command to copy ssh config files in Windows home into MSYS2 home.
시작 버튼을 누른 후 "MSYS2 UCRT64"를 입력하고 엔터키를 눌러 MSYS2를 연다. 그리고 다음 명령을 입력해 윈도우즈 홈의 ssh 구성 파일들을 MSYS2 홈으로 복사한다.
cp -a "$USERPROFILE/.ssh" ~/
4. After clicking the Start button, type "Git GUI" and press enter to open Git GUI. And select Menu → Help → Show SSH Key to check the created key, then click the "Copy to Clipboard" button to copy the key to the clipboard.
시작 버튼을 누른 후 "Git GUI"를 입력하고 엔터키를 눌러 Git GUI를 연다. 그리고 Menu → Help → Show SSH Key를 선택해 생성된 키를 확인 한 후, "Copy to Clipboard" 버튼을 눌러 키를 클립보드로 복사한다.
5. After open the following github website and log in, select the icon in the upper right corner → Settings → SSH and GPG Keys → New SSH Key.
다음 깃허브 웹사이트 에 접속해 로그인 한 후, 우측 상단 icon → Settings → SSH and GPG Keys → New SSH Key 를 선택한다.
6. When the Add new SSH Key web page opens, click the key input text box and then press Control-V to paste the key.
Add new SSH Key 웹페이지가 열리면 키 입력 텍스트 박스를 클릭 후 Control-V 키를 키를 붙여넣는다.
7. Enter the name freely, select "Authentication Key" as the key type, and press the "Add SSH Key" button.
이름은 자유롭게 입력하고, Key type으로 "Authentication Key"를 선택한 후 "Add SSH Key" 버튼을 누른다.
Installing J-Link Software 제이링크 소프트웨어 설치하기
If you are not using J-Link as a JTAG interface, skip this step.
제이텍 인터페이스로 제이링크를 사용하지 않을 경우 이 과정은 생략한다.
1. Download and install the installation package from the following website.
다음 웹사이트에서 설치 패키지를 받아서 설치한다.
- https://www.segger.com
- Downloads → J-Link / J-Trace → J-Link Software and Documentation Pack → Windows → 64-bit Installer
- JLink_Windows_V796_x86_64.exe
- Downloads → J-Link / J-Trace → J-Link Software and Documentation Pack → Windows → 64-bit Installer
2. After clicking the Start button, type "sysdm.cpl" and press enter to open the system properties. And add the path of the executable file installed in the user environment variable "PATH".
시작 버튼을 누른 후 "sysdm.cpl"를 입력하고 엔터키를 눌러 시스템 속성을 연다. 그리고 사용자 환경 변수 "PATH"에 설치된 실행 파일 경로를 추가한다.
- Advanced 고급 → Environment Variables 환경 변수 → User variables 사용자 변수 → Path
- C:\Program Files\SEGGER\JLink_<version>
- ex: C:\Program Files\SEGGER\JLink_V796
- C:\Program Files\SEGGER\JLink_<version>
Installing STM32CubeProgrammer 에스티링크 큐브 프로그래머 설치하기
If you are not using ST-Link as a JTAG interface, skip this step.
제이텍 인터페이스로 에스티링크를 사용하지 않을 경우 이 과정은 생략한다.
1. Download and install the installation package from the following website.
다음 웹사이트에서 설치 패키지를 받아서 설치한다.
- https://www.st.com
Tools & Software → Development Tools → Software Development Tools → STM32 Software Development Tools → STM32 Programmers → Product selector → STM32CubeProg → Open software page → Get Software → STM32CubePrg-W64
- en.stm32cubeprg-win64-v2-15-0.zip
Installing OpenOCD 오픈오씨디 설치하기
If you are not using ST-Link as a JTAG interface, skip this step.
제이텍 인터페이스로 에스티링크를 사용하지 않을 경우 이 과정은 생략한다.
1. Open the command prompt "cmd" and install package "openocd" by typing the following command.
명령 프롬프트 "cmd"를 연 후, 다음 명령을 입력해 패키지 "openocd"를 설치한다.
pacman -S --needed mingw-w64-ucrt-x86_64-openocd
Installing PuTTY 퍼티 설치하기
PuTTY is installed for UART communication. If you have other UART communication terminal software in use, skip this step.
퍼티는 유아트 통신을 위해 설치한다. 사용중인 다른 유아트 통신 터미널 소프트웨어가 있다면 이 과정은 생략한다.
1. Download and install the installation package from the following website.
다음 웹사이트에서 설치 패키지를 받아서 설치한다.
- https://putty.org
- Download PuTTY → Package files
- putty-64bit-0.76-installer.msi
- Download PuTTY → Package files
Notes 참고 사항
The GDB server through ST-Link can be executed by entering the following command in the command prompt.
에스티링크를 통한 GDB 서버는 명령 프롬프트에서 다음 명령을 입력해 실행할 수도 있다.
openocd -f <OpenOCD configuration file name>
OpenOCD configuration file is created in the following location when building Ubinos.
오픈오씨디 configuration file은 유비노스 빌드 시 다음 위치에 생성된다.
- <project directory>/output/<config name>/openocd.cfg
If multiple ST-Links are connected via USB, you can select the ST-Link to connect by specifying the serial number as follows.
USB로 다수의 에스티링크가 연결되어 있는 경우, 다음과 같이 일련 번호를 명시해 연결할 에스티링크를 선택할 수 있다.
openocd -f <OpenOCD configuration file name> -c "hla_serial <ST-Link serial number>"
The ST-Link serial number can be found in the message window after connecting "STM32 ST-LINK Utility" to the target as follows.
에스티링크 일련 번호는 다음과 같이 "STM32 ST-LINK Utility"를 타겟에 연결한 후 메시지 창에서 확인할 수 있다.
- Menu → Target → Connect → Message window → ST-LINK SN